Pumpkin Shaped Sourdough Bread

by sourdoughjesha on November 7, 2025
This easy pumpkin shaped sourdough bread is the ultimate fall loaf! It’s loaded with real pumpkin, warm spices, and bakes up into a beautiful pumpkin shape.

Pumpkin-shaped sourdough bread is one of my favorite things to bake when fall rolls around. It’s soft and airy on the inside, with a crispy golden crust and the perfect blend of warm spices and delicious pumpkin flavor. This loaf is super festive and is the perfect recipe for fall gatherings, holiday dinners, or any special occasion. Adapted from my classic sourdough bread recipe, it’s so easy to make and perfect for beginners.
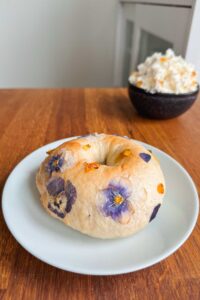
Looking for more sourdough baking recipes? Check out my easy sourdough bagels, blueberry sourdough bread, and these pretty flower bagels!
If you love all things pumpkin and pumpkin spice, you are going to be obsessed with this pumpkin-shaped sourdough bread! It’s super easy to shape, and the finished bread looks just like a full-sized pumpkin when it bakes up. All you need are a few simple ingredients, like pumpkin puree (I used canned, but you can also make your own!), large cinnamon sticks, and some baking twine or food-grade cotton string.
Whether you’re a seasoned sourdough baker or brand new, this recipe is a fun and festive way to change things up. I’ll guide you through each step of the process using just a handful of simple ingredients and basic kitchen tools. Get ready to bake the most beautiful, bakery-worthy pumpkin-shaped sourdough bread right from your own kitchen. When you’re done with this recipe, make sure to follow it up with these adorable pumpkin-shaped sourdough bagels!
Why You’ll Love Pumpkin Shaped Sourdough Bread
- Made with real pumpkin: This pumpkin shaped sourdough bread doesn’t just look like a pumpkin—it’s made with real pumpkin purée for a rich, cozy flavor and an unbelievably soft, tender crumb.
- Easy to make: Don’t be intimidated by its shape—this recipe is surprisingly simple! With just a few pantry staples, pumpkin purée, and a bit of baking twine, you can create a stunning loaf that looks straight out of a pumpkin patch!
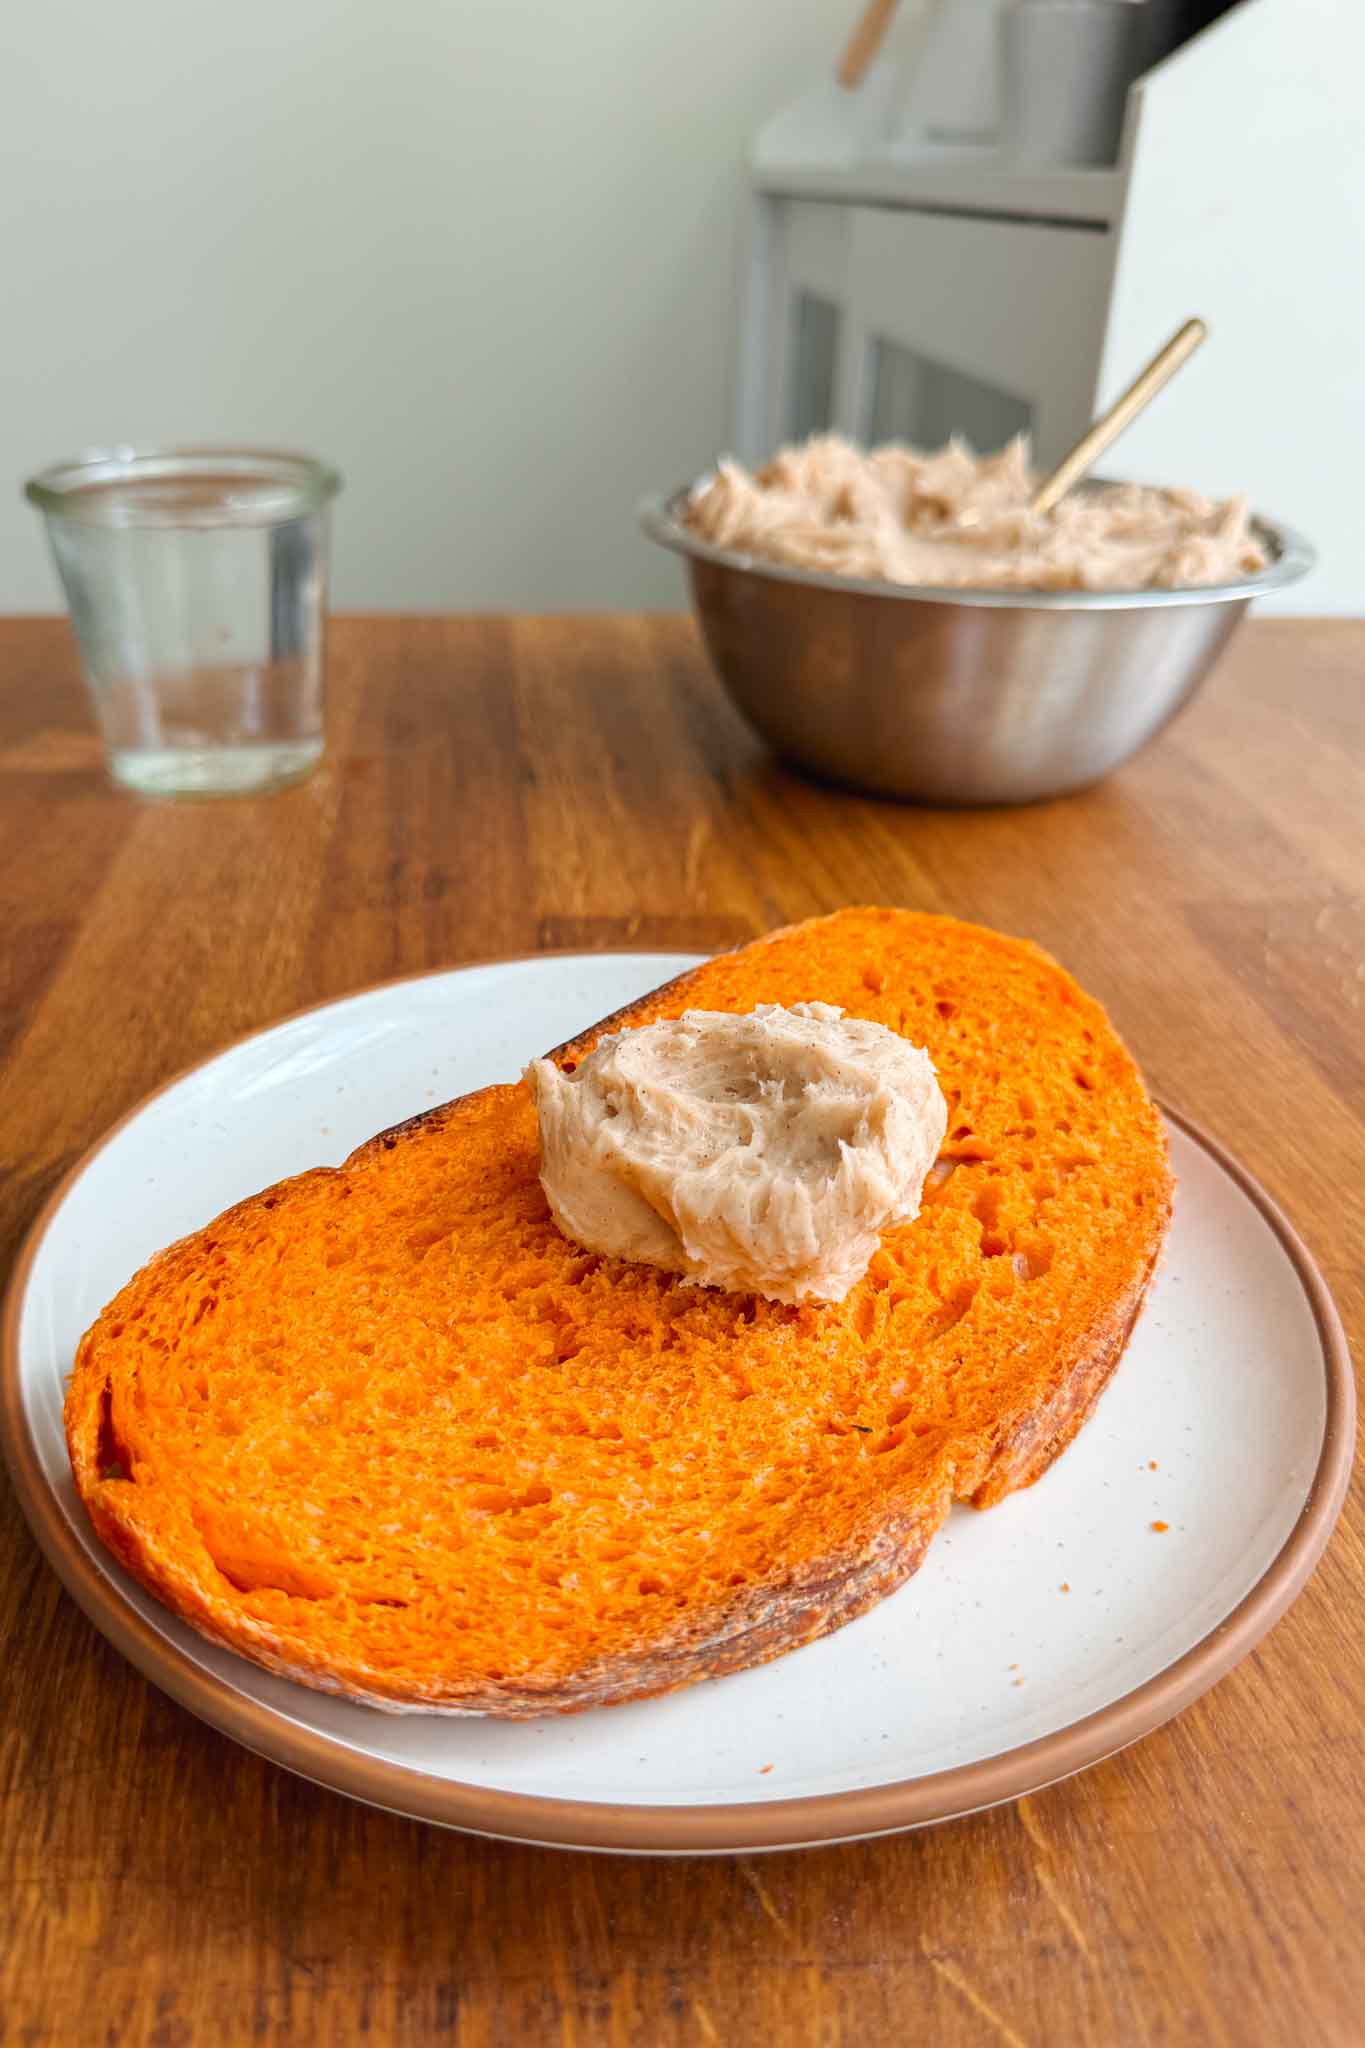
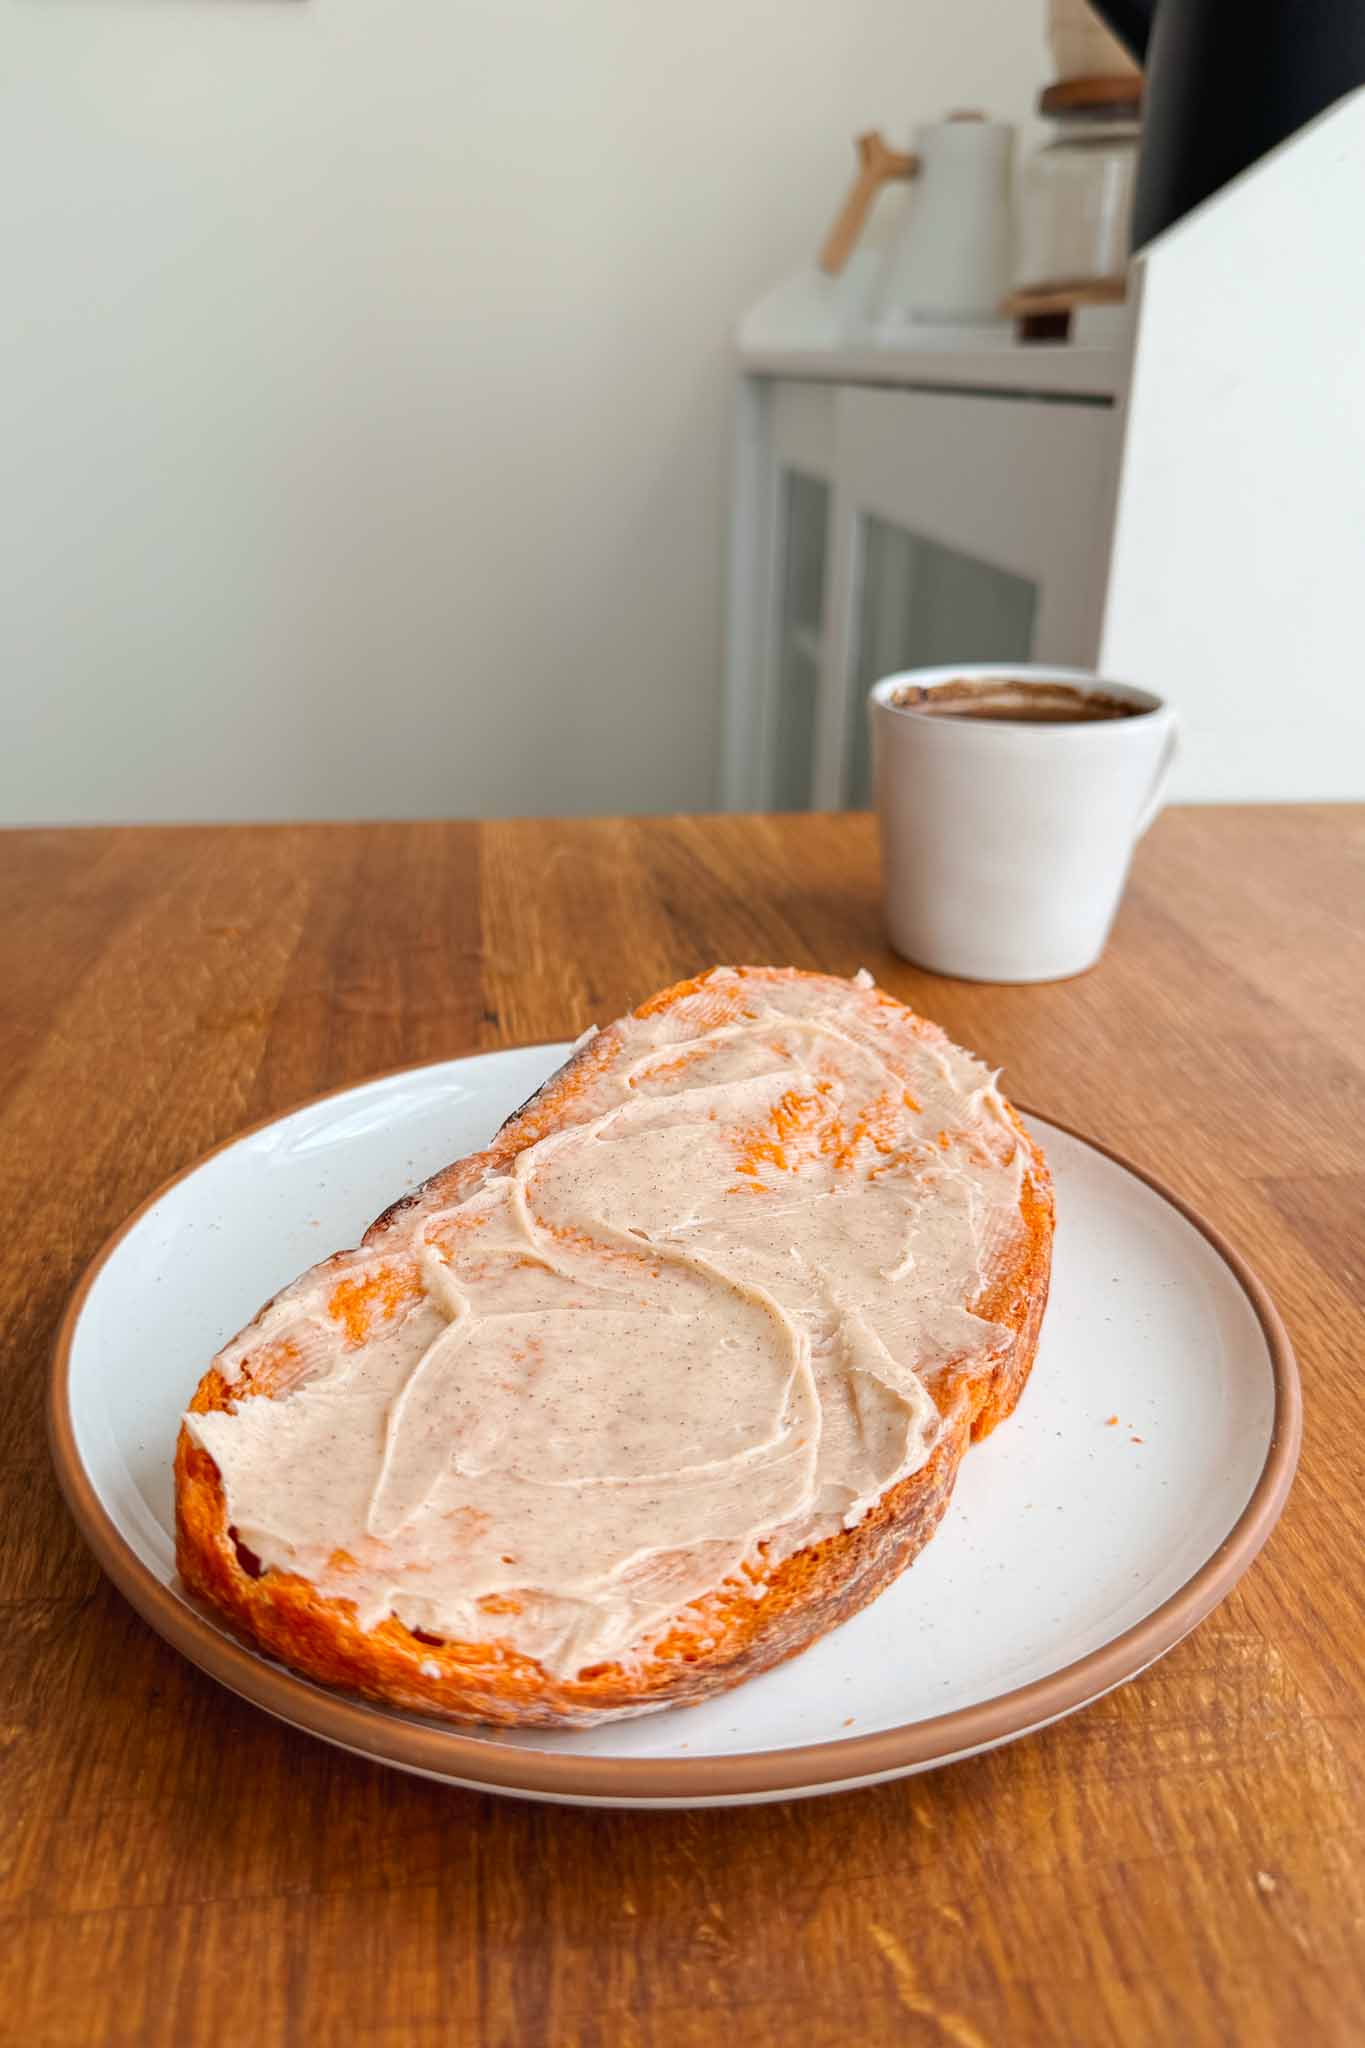
- Perfect for toppings: Top this festive bread with any of your favorites! I love cinnamon honey butter (Texas Roadhouse style) or a thick layer of pumpkin spice cream cheese. Or you can keep it savory and use this delicious bread for sandwiches, serve with fried eggs, and more.
- Sourdough (gut healthy): My pumpkin sourdough bread recipe is naturally leavened with sourdough starter, so it has all of the incredible flavor and gut-healthy benefits of sourdough!
Watch My Pumpkin Shaped Sourdough Bread Video
Ingredients for Pumpkin Shaped Sourdough Bread
Here’s all of the ingredients you’ll need to make this pumpkin shaped sourdough bread recipe at home:
- Bread flour: A high protein bread flour is your best option for baking sourdough bread. I love to use King Arthur’s Bread Flour.
- Whole wheat flour: This is optional! I like to use a little bit of whole wheat flour for added flavor and nutrition. Feel free to omit, and replace with an equal amount of bread flour instead.
- Water: This recipe uses less water than my standard sourdough bread because the pumpkin puree adds to the hydration level.
- Sourdough starter: Make sure to feed your starter roughly 8-12 hours before you plan on mixing the dough. Your starter is ready to use when it’s doubled in size and is vigorously bubbly.
- Salt: Salt is your friend in baking! It’s essential for flavor and helps to control the fermentation process.
- Honey: I like to use raw honey for a little extra sweetness. You can also use regular sugar, brown sugar, coconut sugar, or your preferred sweetener.
- Pumpkin puree: I love Libby’s pumpkin puree because it’s extra thick and creamy, but any canned puree will work. You can also make your own!
- Pumpkin spice: I use this pumpkin spice seasoning blend! You can also make your own by combining cinnamon, ginger, nutmeg, cloves, and allspice.
Additional Ingredients
- Oil: Oil prevents the baking twine from sticking to the bread. Make sure to fully submerge the strings in a bowl of oil before using them.
- Baking twine: Any standard baking twine can be used, or a food grade cotton string.
- Cinnamon sticks: I like to use one extra large cinnamon stick for the stem. I got my at the grocery store, but here’s a great option from Amazon as well.
- Orange food coloring (optional): This is optoinal as well. I love this all natural plant based food coloring to give the dough a beautiful orange pumpkin color!
How to Make Pumpkin Shaped Sourdough Bread
This pumpkin shaped sourdough bread is so easy to make following my simple step-by-step guide.
Day 1: Mix the dough and first rise
- Make the dough: In a large bowl, add the water, sourdough starter, honey, and optional orange food coloring and whisk together. Then add the flour, pumpkin puree, pumpkin spice, and salt, and mix everything together until a dough forms and no dry patches remain. Cover the bowl and let the dough rest for 30 minutes.
- Stretch and fold: After the dough has rested for 30 minutes, complete one round of stretch and folds. To do this, lightly wet your hands to avoid sticking, then lift one edge of the dough upward until you feel gentle tension and fold it back over the center. Turn the bowl a quarter turn and repeat this motion on each of the remaining three sides. You’ll end up with four folds total—one from each direction. Once finished, cover the bowl and let the dough rest for 60 minutes. This technique develops gluten strength without traditional kneading. Repeat this step every 60 minutes during the bulk fermentation in the next step, until you’ve completed a total of 4 rounds of stretch and folds.
- First rise (bulk fermentation): Allow the dough to rise at room temperature for about 6–8 hours in total. It’s ready once it’s grown by roughly 50%, looks bubbly on the surface, and has a light, jiggly texture when you move the bowl. Keep in mind, fermentation time can vary based on your room temperature and how active your sourdough starter is.
- Shape: Once the dough has finished rising, it’s time to shape it. Start by lining your proofing basket and dusting it with a light coating of flour. Lightly flour your work surface, then gently turn the dough out onto it. To shape, fold the bottom edge up toward the center so it covers about one-third of the dough. Next, fold the left side toward the center, then the right side so it slightly overlaps the left. Fold the top edge down just past the middle, then bring the bottom edge up and over the top. Flip the dough so the seam faces down. With lightly floured hands, shape the dough into a tight, smooth round by gently pulling it toward you and rotating it to create surface tension. Use a bench scraper to lift and transfer the dough into your floured proofing basket, seam side up.
- Proof (second rise): Cover the dough and place it in the refrigerator to proof overnight, or for up to 48 hours. I usually let mine chill for at least 12 hours, which helps develop flavor and texture. This process also gives lactic acid bacteria in your sourdough starter time to predigest the flour, which enhances nutrition and all of the gut-healthy benefits of sourdough.
Day 2: Shape into a Pumpkin, Score and Bake
- Preheat your oven and Dutch oven: When it’s time to bake, place your Dutch oven (with the lid on) inside your oven. Preheat to 500°F (260°C) and allow it to heat thoroughly for 30–60 minutes.
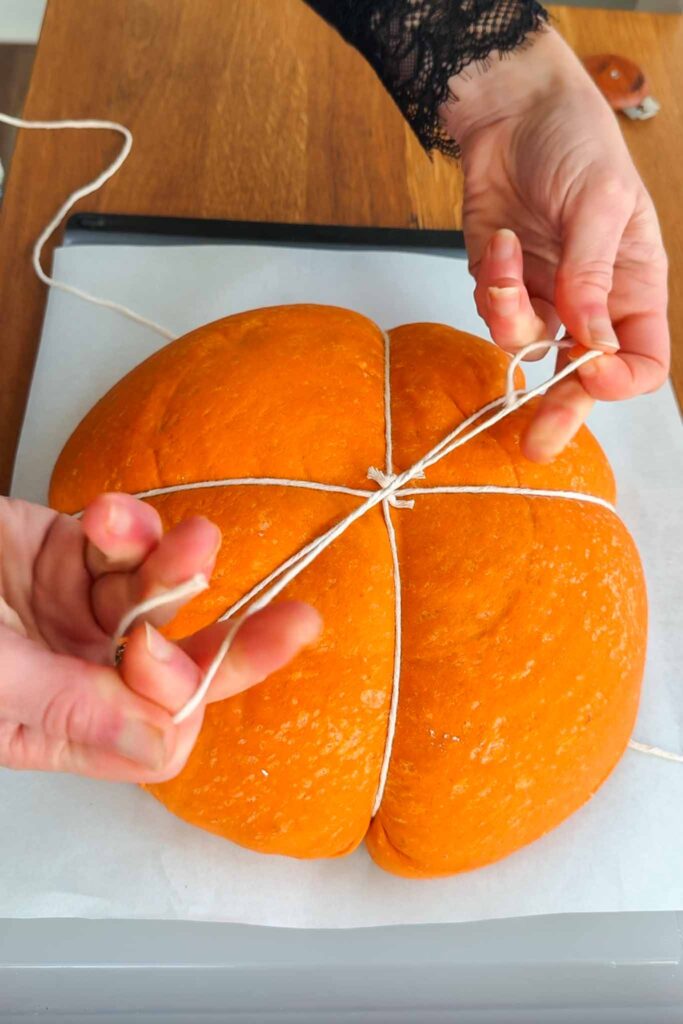
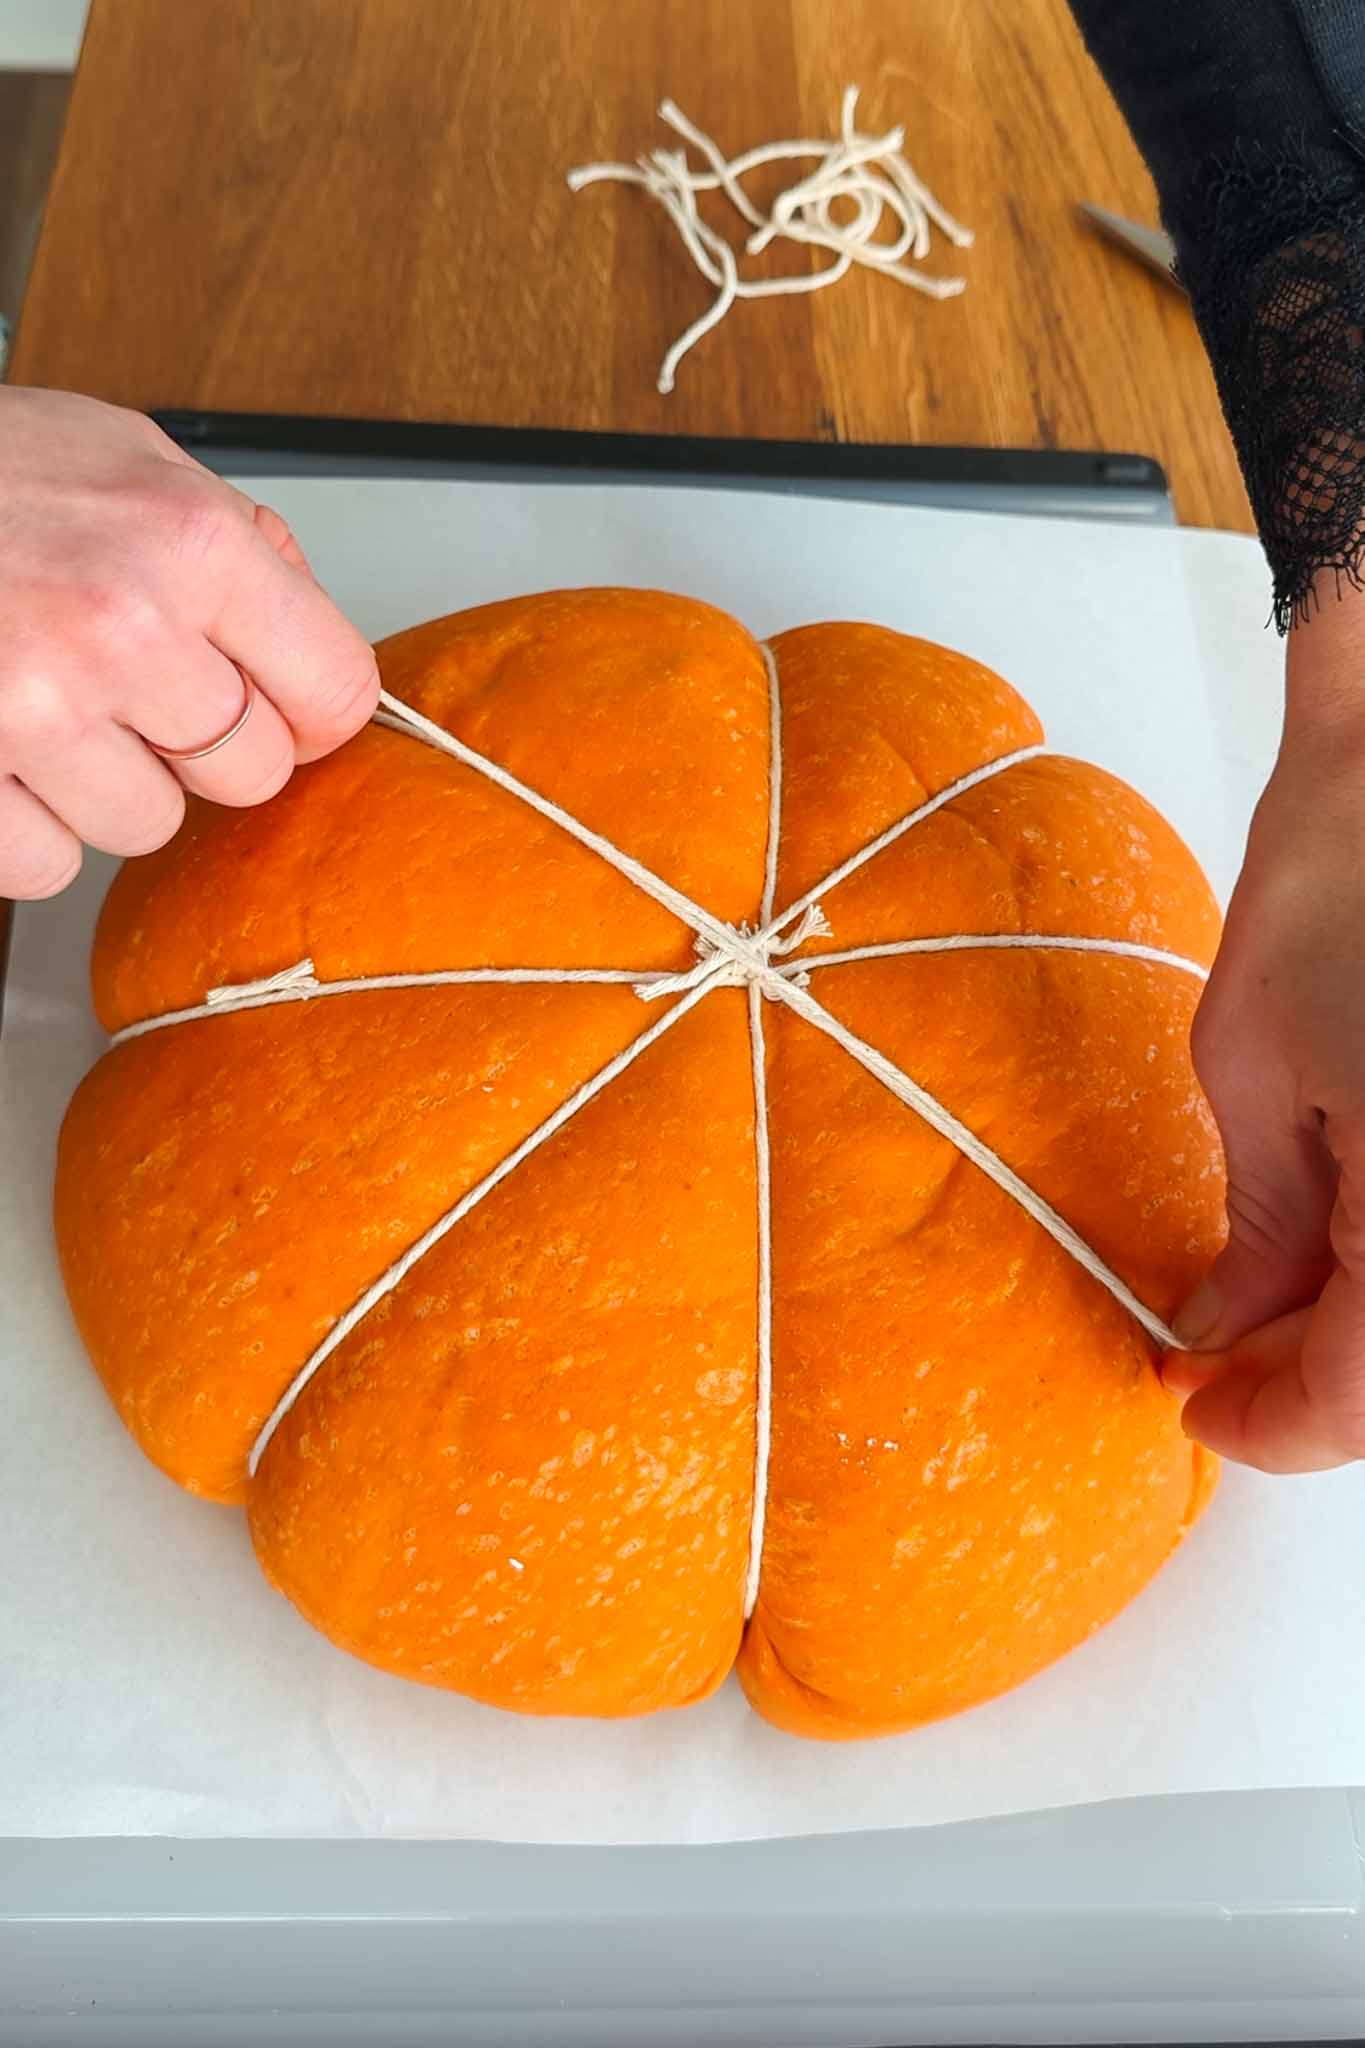
- Shape the dough into a pumpkin: Start by cutting 4 pieces of cooking twine into 20-inch strands, then lightly coat them in oil (olive, vegetable, or avocado oil all work great) to prevent sticking. Lay the strands across the top of the dough, overlapping in the center to form a star. Place a sheet of parchment paper over the dough and gently flip the dough, and turn it out onto the table so it’s lying on the parchment. Working one strand at a time, tie the ends together in a square knot. Make sure to tie the string loosely so your dough has room to expand in the oven. Trim any excess twine, then repeat with the remaining strands until you’ve formed 8 even sections that resemble a tiny pumpkin!
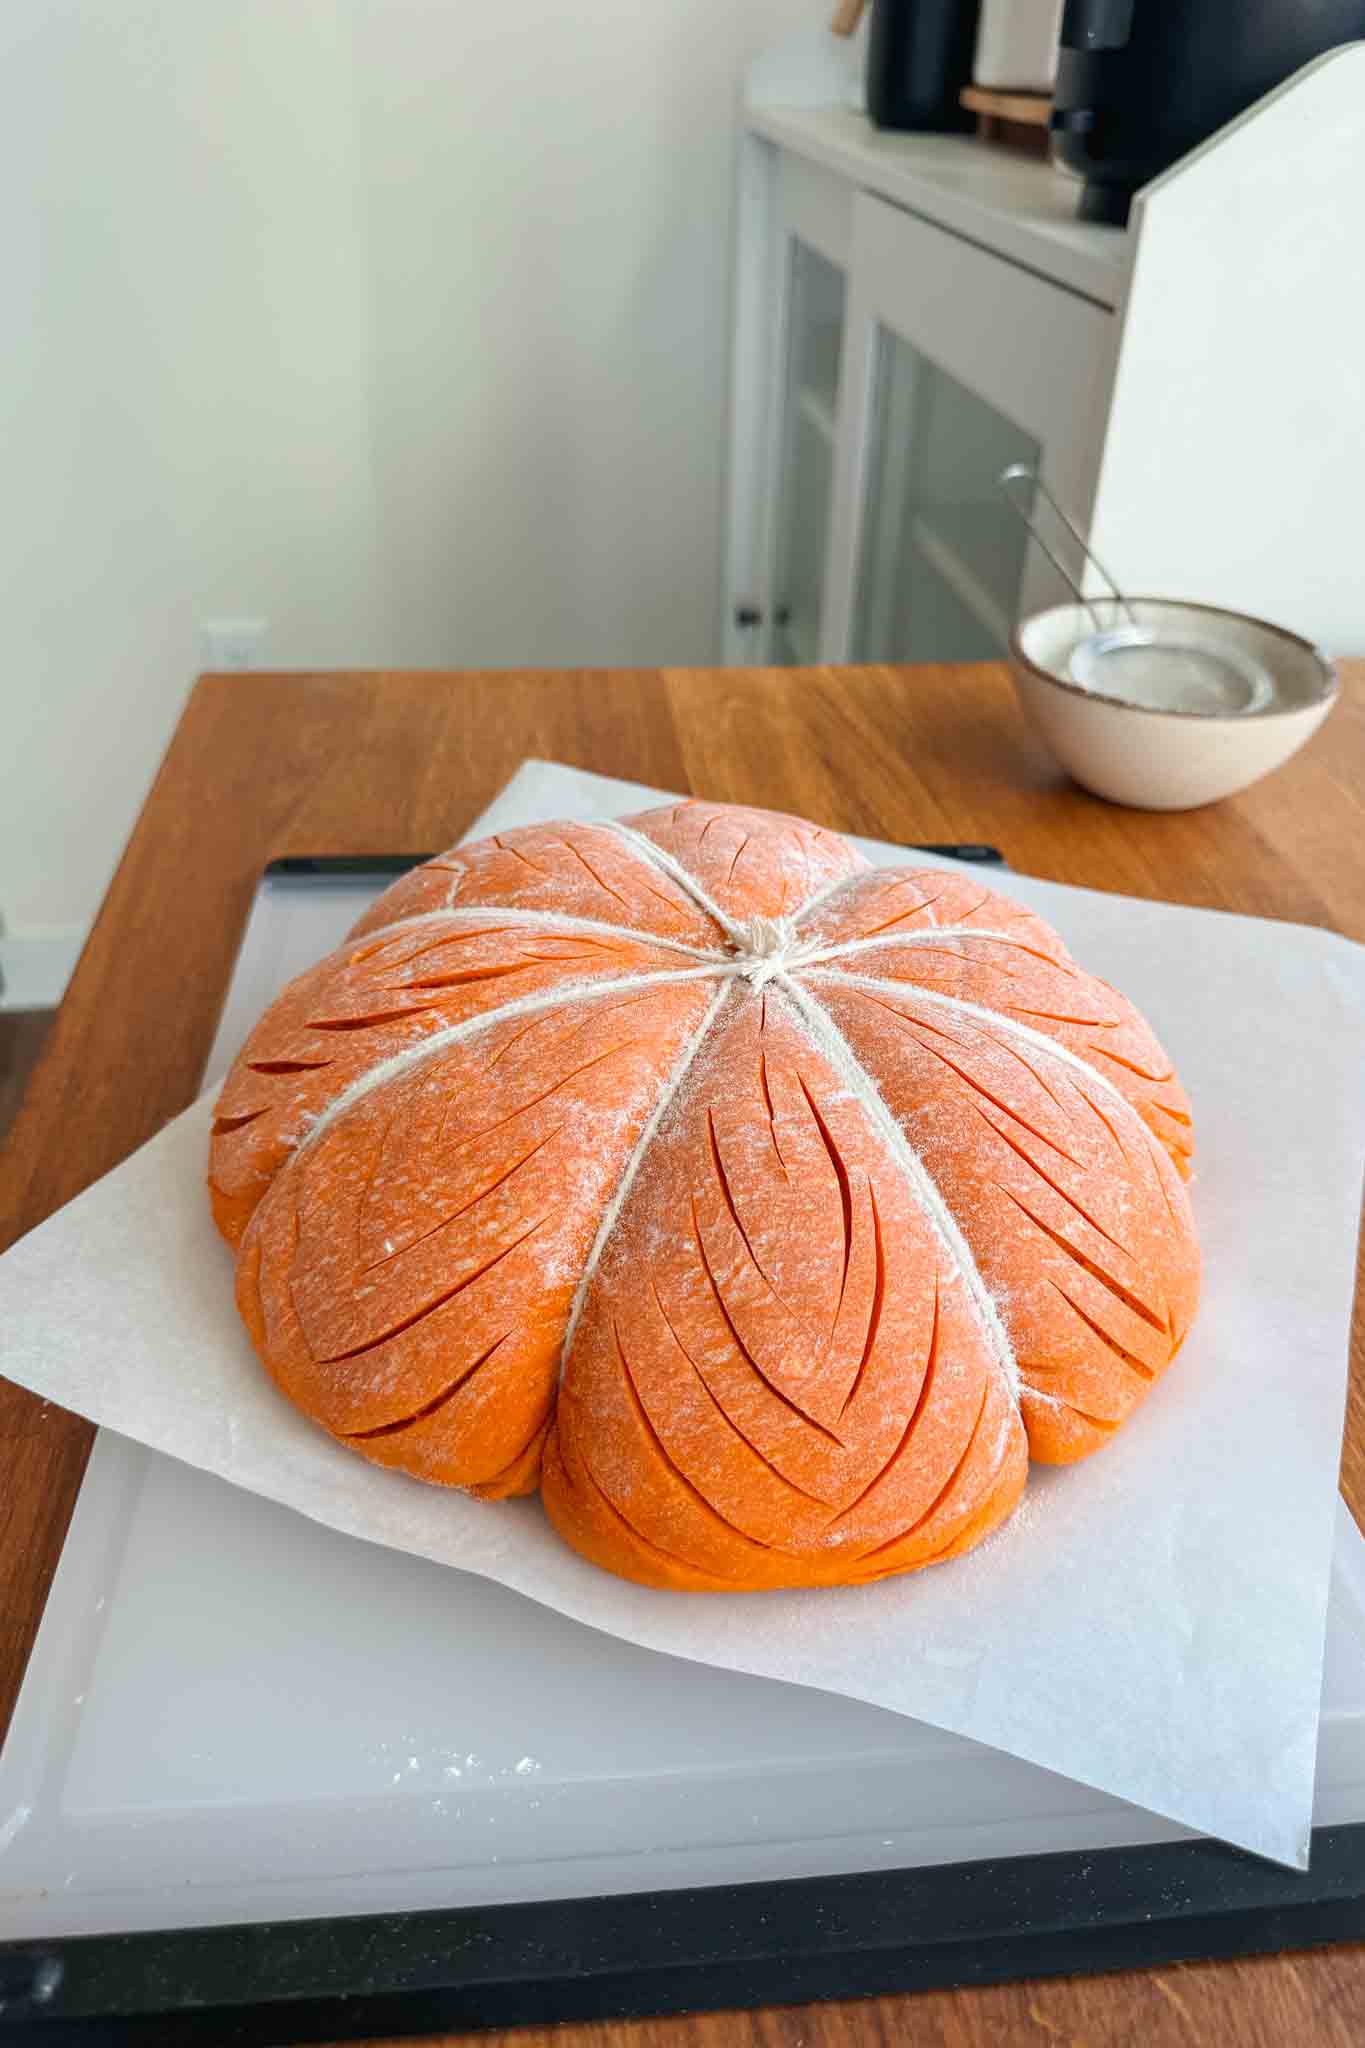
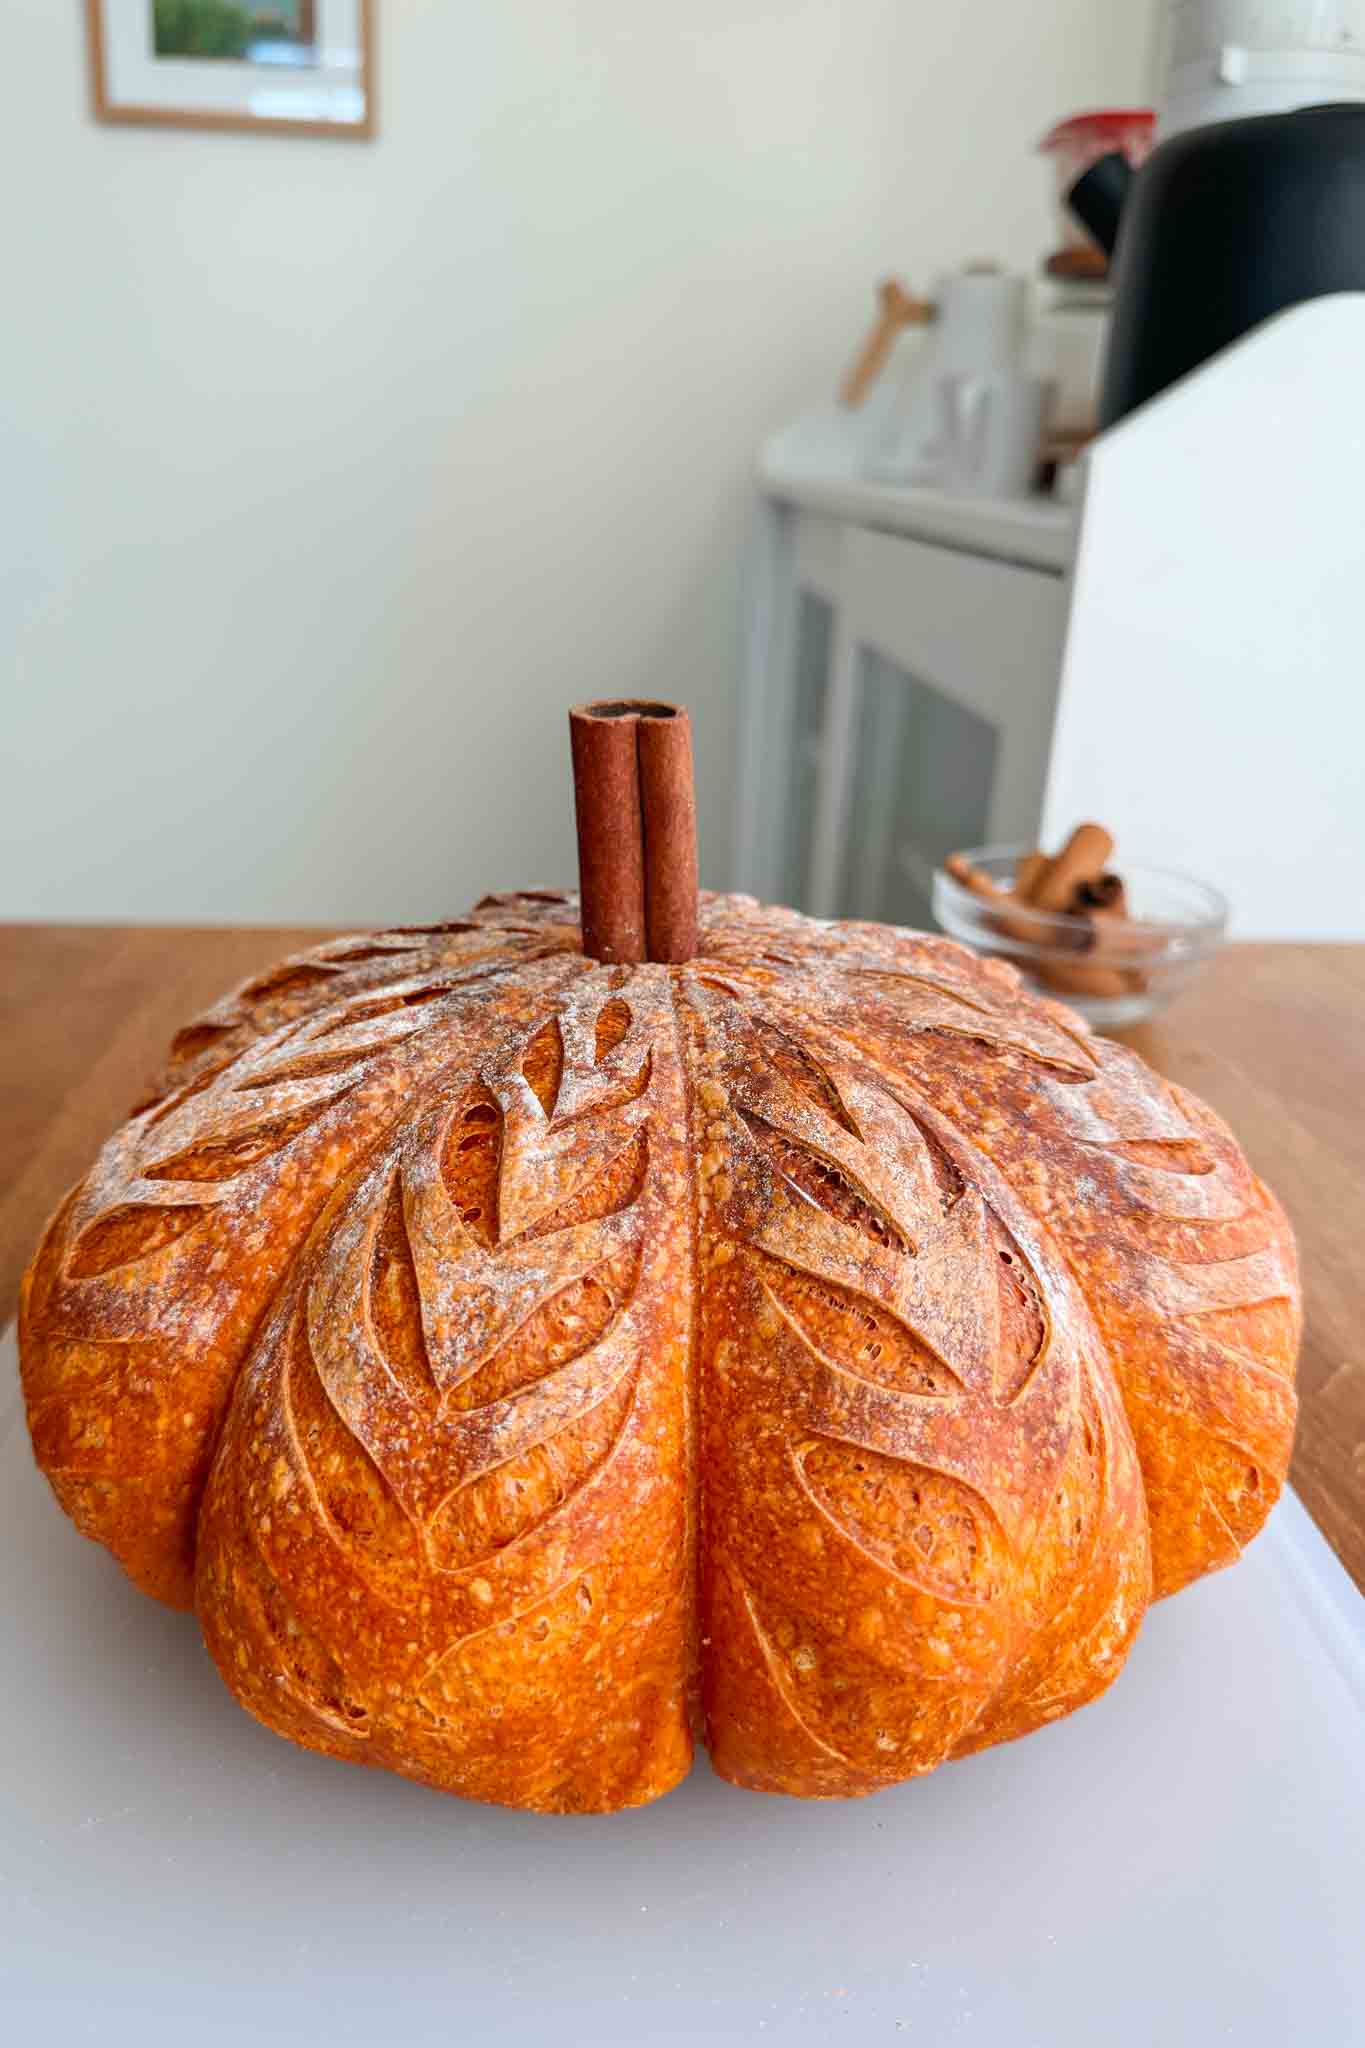
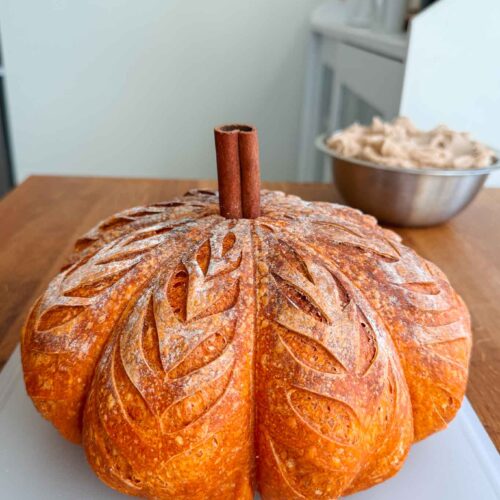
- Score your dough: Use a sharp blade or bread lame to make a cut at a 45-degree angle just beneath the surface of the dough’s skin, and create any pattern you’d like. I went for a leaf design!
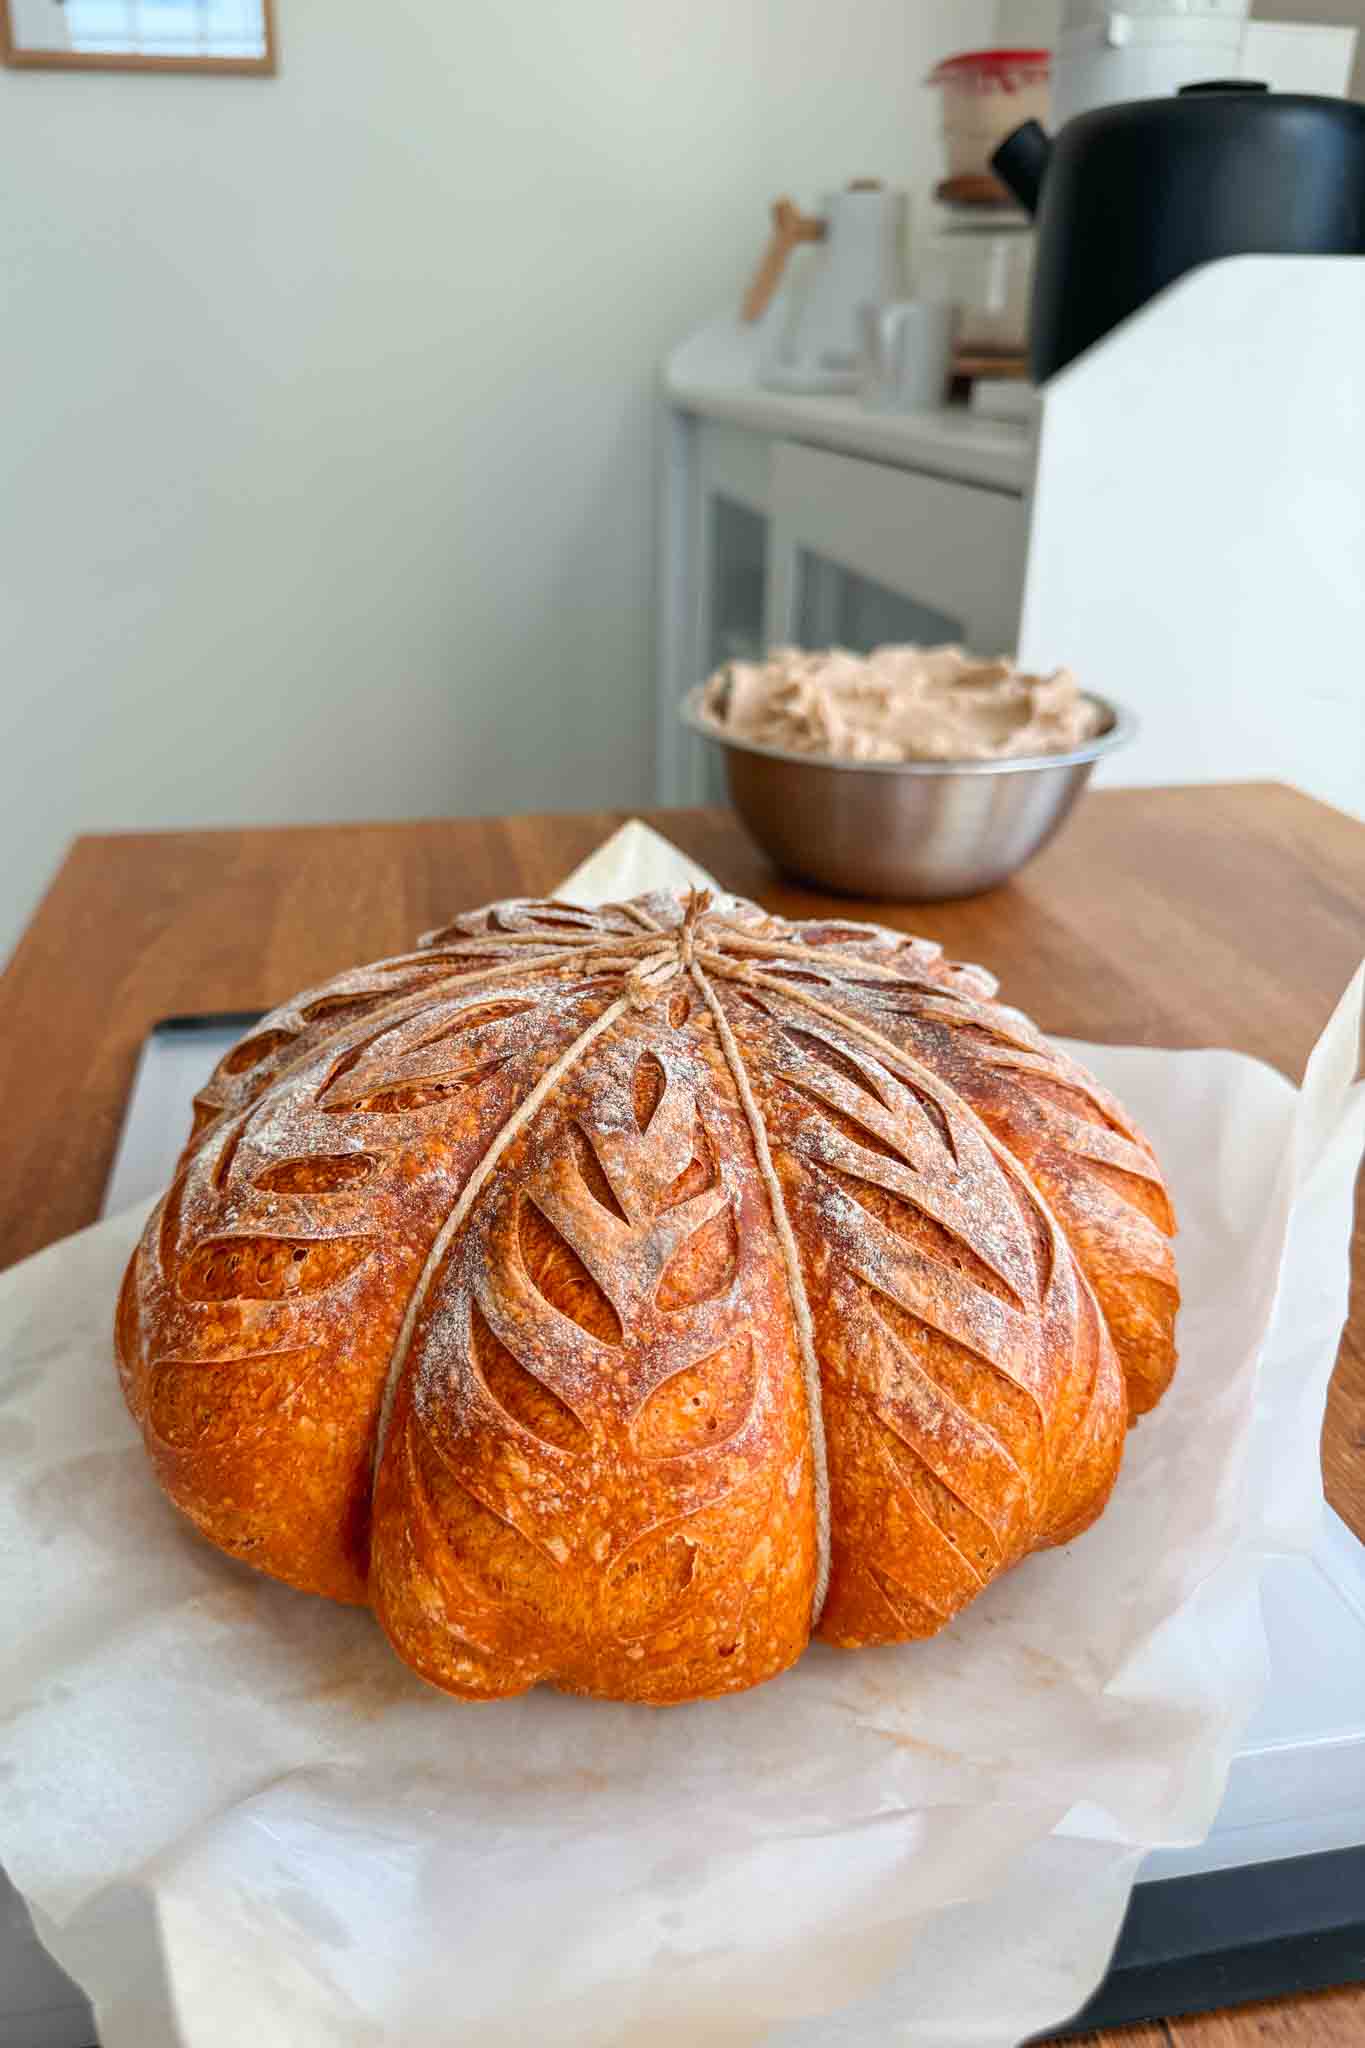
- Bake the bread: Carefully remove the Dutch oven from the oven and take off the lid. Using the parchment paper, lift the dough and gently lower it into the hot pot. Cover with the lid and bake at 500°F (260°C) for 30 minutes. Then, remove the lid and continue baking for another 10–15 minutes, until the crust is a deep golden brown or the internal temperature reads 208–210°F (97–99°C). Once baked, lift the bread out and let it cool completely on a wire rack for 1–2 hours before slicing.
- Serve and enjoy: Slice into your pumpkin-shaped sourdough and enjoy it warm with honey cinnamon butter, pumpkin spice cream cheese, or a drizzle of honey. It’s the perfect cozy fall treat!
Sample Baking Schedule
I love having freshly baked bread ready for the weekend, so here’s my go-to schedule for making this festive pumpkin-shaped sourdough loaf so it’s ready on Saturday morning. The cold-proof step is flexible, so you can bake it first thing Saturday—or anytime Sunday if you prefer a longer fermentation for even deeper flavor.
Thursday Evening (8 PM): Feed your sourdough starter with a 50/50 mix of flour and water. Your starter is ready when it’s bubbly, has doubled in height, and is just beginning to fall from its peak. Don’t stress too much about timing—use visual cues to guide you so your starter is ripe and active when you mix your dough.
Friday Morning (7:30 AM): Mix your dough and begin the bulk fermentation.
Friday Afternoon/Evening (4:30 PM): Transfer the dough to the refrigerator for the cold proof or overnight rest.
Saturday Morning (8:00 AM): Score and bake your pumpkin-shaped sourdough!
How Do You Shape Pumpkin Shaped Sourdough Bread?
Shaping your pumpkin bread couldn’t be easier! Here’s how to do it step by step:
- Prepare the twine: Cut four pieces of cooking twine, each about 20 inches long. Lightly coat each strand with a bit of oil (olive, vegetable, or avocado all work well) to keep them from sticking to the dough.
- Set up the shape: While the dough is still in the proofing basket, lay the four strands over the dough so they overlap in the center, forming a star shape.
- Flip the dough: Place a piece of parchment paper on top of the dough, then carefully flip it over to turn the dough out onto the table so it’s resting on the parchment.
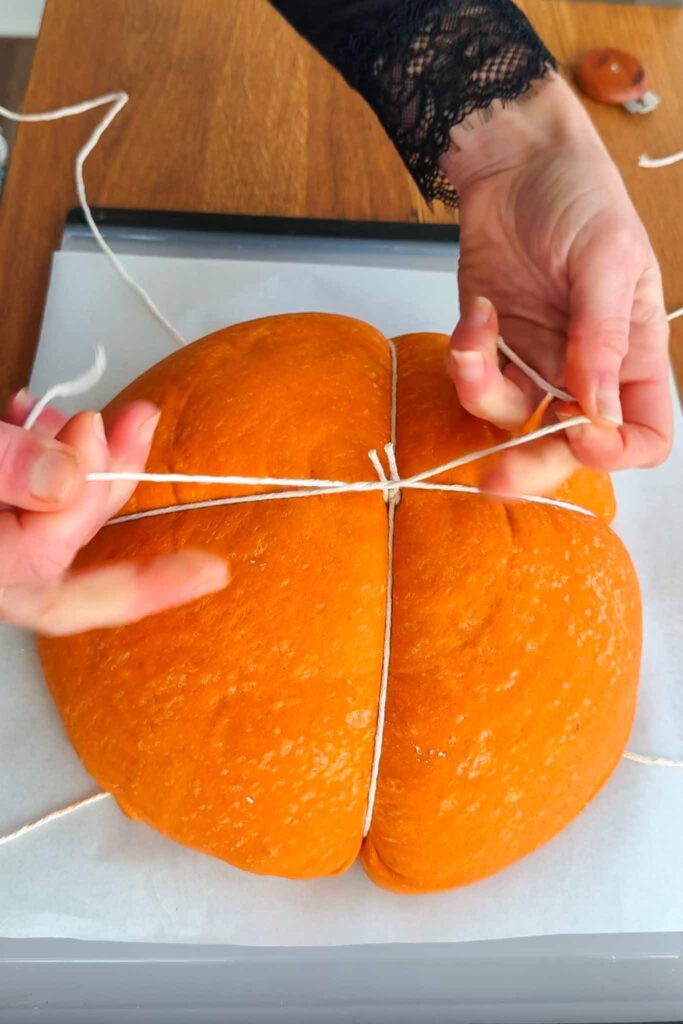
- Tie the pumpkin sections: Working with one strand at a time, bring the ends together and tie a loose square knot—just snug enough to define the sections without squeezing the dough too tightly. Trim off any extra twine. Repeat with the remaining strands until you’ve created eight evenly spaced sections that mimic the look of a little pumpkin.
Is Pumpkin Sourdough Healthy?
Yes it is! Pumpkin-shaped sourdough bread isn’t just beautiful—it’s full of wholesome goodness. The natural fermentation process makes sourdough bread easy to digest and more nutrient-dense than regular bread, as wild yeast and beneficial bacteria help break down gluten and phytic acid, improving mineral absorption. It also has a lower glycemic index, meaning it has a lower impact on blood sugar. The addition of pumpkin purée adds even more nutritional benefits—it’s rich in vitamin A, antioxidants, and fiber! This festive loaf is as nourishing as it is delicious.
If You Love This Pumpkin Shaped Sourdough Bread, Try These Recipes Next:
- Homemade Pistachio Croissants
- Blueberry Sourdough Bagels
- Homemade Sourdough Croissants
- Sourdough Jalapeno Cheddar Bagels
- How to Make Cream Cheese
Pumpkin Shaped Sourdough Bread
Ingredients
Sourdough Starter
- 20 g 1 tablespoon sourdough starter
- 80 g ⅔ cups flour
- 80 g ⅓ cups water
Pumpkin Sourdough Bread
- 475 g ( 3¾ cups) Bread flour
- 25 g (3 tablespoons) Whole wheat flour (This is optional. You can replace it with bread flour if preferred.)
- 100 g (⅓ cup + 1 tablespoon) pumpkin puree
- 100 g (⅓ cup) sourdough starter
- 325 g (1⅓ cups + 1) water
- 10 g (1¾ teaspoons) salt
- 20 g (1 tabelspoon and 1 teaspoon) honey
- 1 teaspoon pumpkin spice
Additional Ingredients
- Optional: Orange food coloring to color your dough orange. I like this all-natural plant-based food coloring.
- Baking twine or food-grade cotton string (used for shaping the bread into a pumpkin)
- Oil for soaking the baking twine (I like to use olive oil or avocado oil, but any will work!)
- 1 cinnamon stick (large) to be used as the stem
Instructions
Feed your sourdough starter
- Feed starter: About 8–12 hours before mixing your dough, feed your sourdough starter. You’ll need 100g (½ cup) of active starter for this recipe, so I like to keep 20g (1 tablespoon) of starter and feed it with 80g (⅔ cup) flour and 80g (⅓ cup) water. It’s ready once it’s bubbly, doubled in size, and just starting to fall from its peak.20 g 1 tablespoon sourdough starter, 80 g ⅓ cups water, 80 g ⅔ cups flour
Day 1: Mix the dough and first rise (bulk fermentation)
- Mix the dough: In a large bowl, add the water, sourdough starter, honey, and optional food coloring, and whisk together until combined. Pour in the bread flour, whole wheat flour, pumpkin puree, pumpkin spice, and salt, and mix until a dough forms and no dry patches remain. Cover the dough and let rest at room temperature for 30 minutes.475 g ( 3¾ cups) Bread flour, 25 g (3 tablespoons) Whole wheat flour, 100 g (⅓ cup + 1 tablespoon) pumpkin puree, 100 g (⅓ cup) sourdough starter, 325 g (1⅓ cups + 1) water, 10 g (1¾ teaspoons) salt, 20 g (1 tabelspoon and 1 teaspoon) honey, 1 teaspoon pumpkin spice, Optional: Orange food coloring to color your dough orange. I like this all-natural plant-based food coloring.
- Stretch and fold: After 30 minutes, perform your first set of stretch and folds. To perform one set of stretch and folds, begin by splashing some water on your hands so they are damp. Grab one side of the dough, stretch it up and fold it all the way over the other side of the dough. Rotate the bowl and repeat this process with the next side. Once you’ve completed this process with all 4 sides, cover the dough and let it rest. Repeat this process every 60 minutes during the course of the bulk fermentation in the next step, until you’ve completed a total of 4 rounds of stretch and folds.
- First rise (bulk fermentation): Cover the bowl and let the dough rise at room temperature for roughly 6 – 8 hours. The dough is done rising once it has increased in size by roughly 50%, has air bubbles on top, and is jiggly when shaken. If you're using a glass or transparent plastic container, you will also see bubbles formed on the bottom of the dough. The fermentation time may vary depending on the temperature of your home and the strength of your sourdough starter.
- Shape the dough: Once your dough has completed its first rise, it’s time to shape. Line your proofing basket and dust it lightly with flour. Lightly flour your work surface and gently turn the dough out onto it. To shape, start by folding the bottom third of the dough up toward the center. Then, fold the left side in toward the middle, followed by the right side, slightly overlapping the left. Next, fold the top edge down just past the center, and bring the bottom edge up and over the top. Flip the dough so the seam rests on the counter. With floured hands, gently round the dough into a tight ball by pulling it toward you against the surface of the table to create tension. Use a bench scraper to transfer it to the floured proofing basket, seam-side up. This is my preferred shaping method, but there are many ways to shape sourdough bread — here’s a great video from The Perfect Loaf demonstrating the technique.
- Proof (second rise): Cover the dough and refrigerate it overnight, or for up to 48 hours. I recommend letting it proof for at least 12 hours — this slow fermentation develops deeper flavor, improves the crumb, and boosts the bread’s nutritional value. The extended rest gives your sourdough starter time to work its magic, enhancing both the gut-friendly benefits of the bread, along with the flavor and texture!
Day 2: Shape the Dough into a Pumpkin and Bake!
- Preheat oven and Dutch Oven: Preheat your oven to 500 degrees Fahrenheit and place your Dutch oven with the lid on to preheat for one hour.
- Prepare your strings: Cut the baking twine into four 20’’ long strings. Place the strings into a small bowl of oil and make sure they are completely submerged. This prevents the strings from sticking to the bread when you need to remove them later.Baking twine or food-grade cotton string, Oil for soaking the baking twine
- Shape into a pumpkin: Remove the dough from the fridge. While the dough is still in the banneton, lay each piece of string across the top of the dough so that they criss-cross over the center, forming a star pattern. Place a piece of parchment paper over the strings and the dough, and then gently turn the dough out onto the parchment paper so it's lying on the table. The strings should now be underneath the dough against the table. Working with one string at a time, take both ends and tie them together into a square knot over the center of the dough. Don’t tie it too tight; your dough will need room to expand while baking. Repeat this process with the remaining strings until you have a pumpkin-shaped dough with 8 sections.
- Score: Gently dust some flour over the top of the dough with a sifter, and score each section of the pumpkin-shaped dough with your favorite pattern. I created a leaf pattern for mine! Use the parchment paper to gently transfer the dough into the preheated Dutch oven and place the lid on.
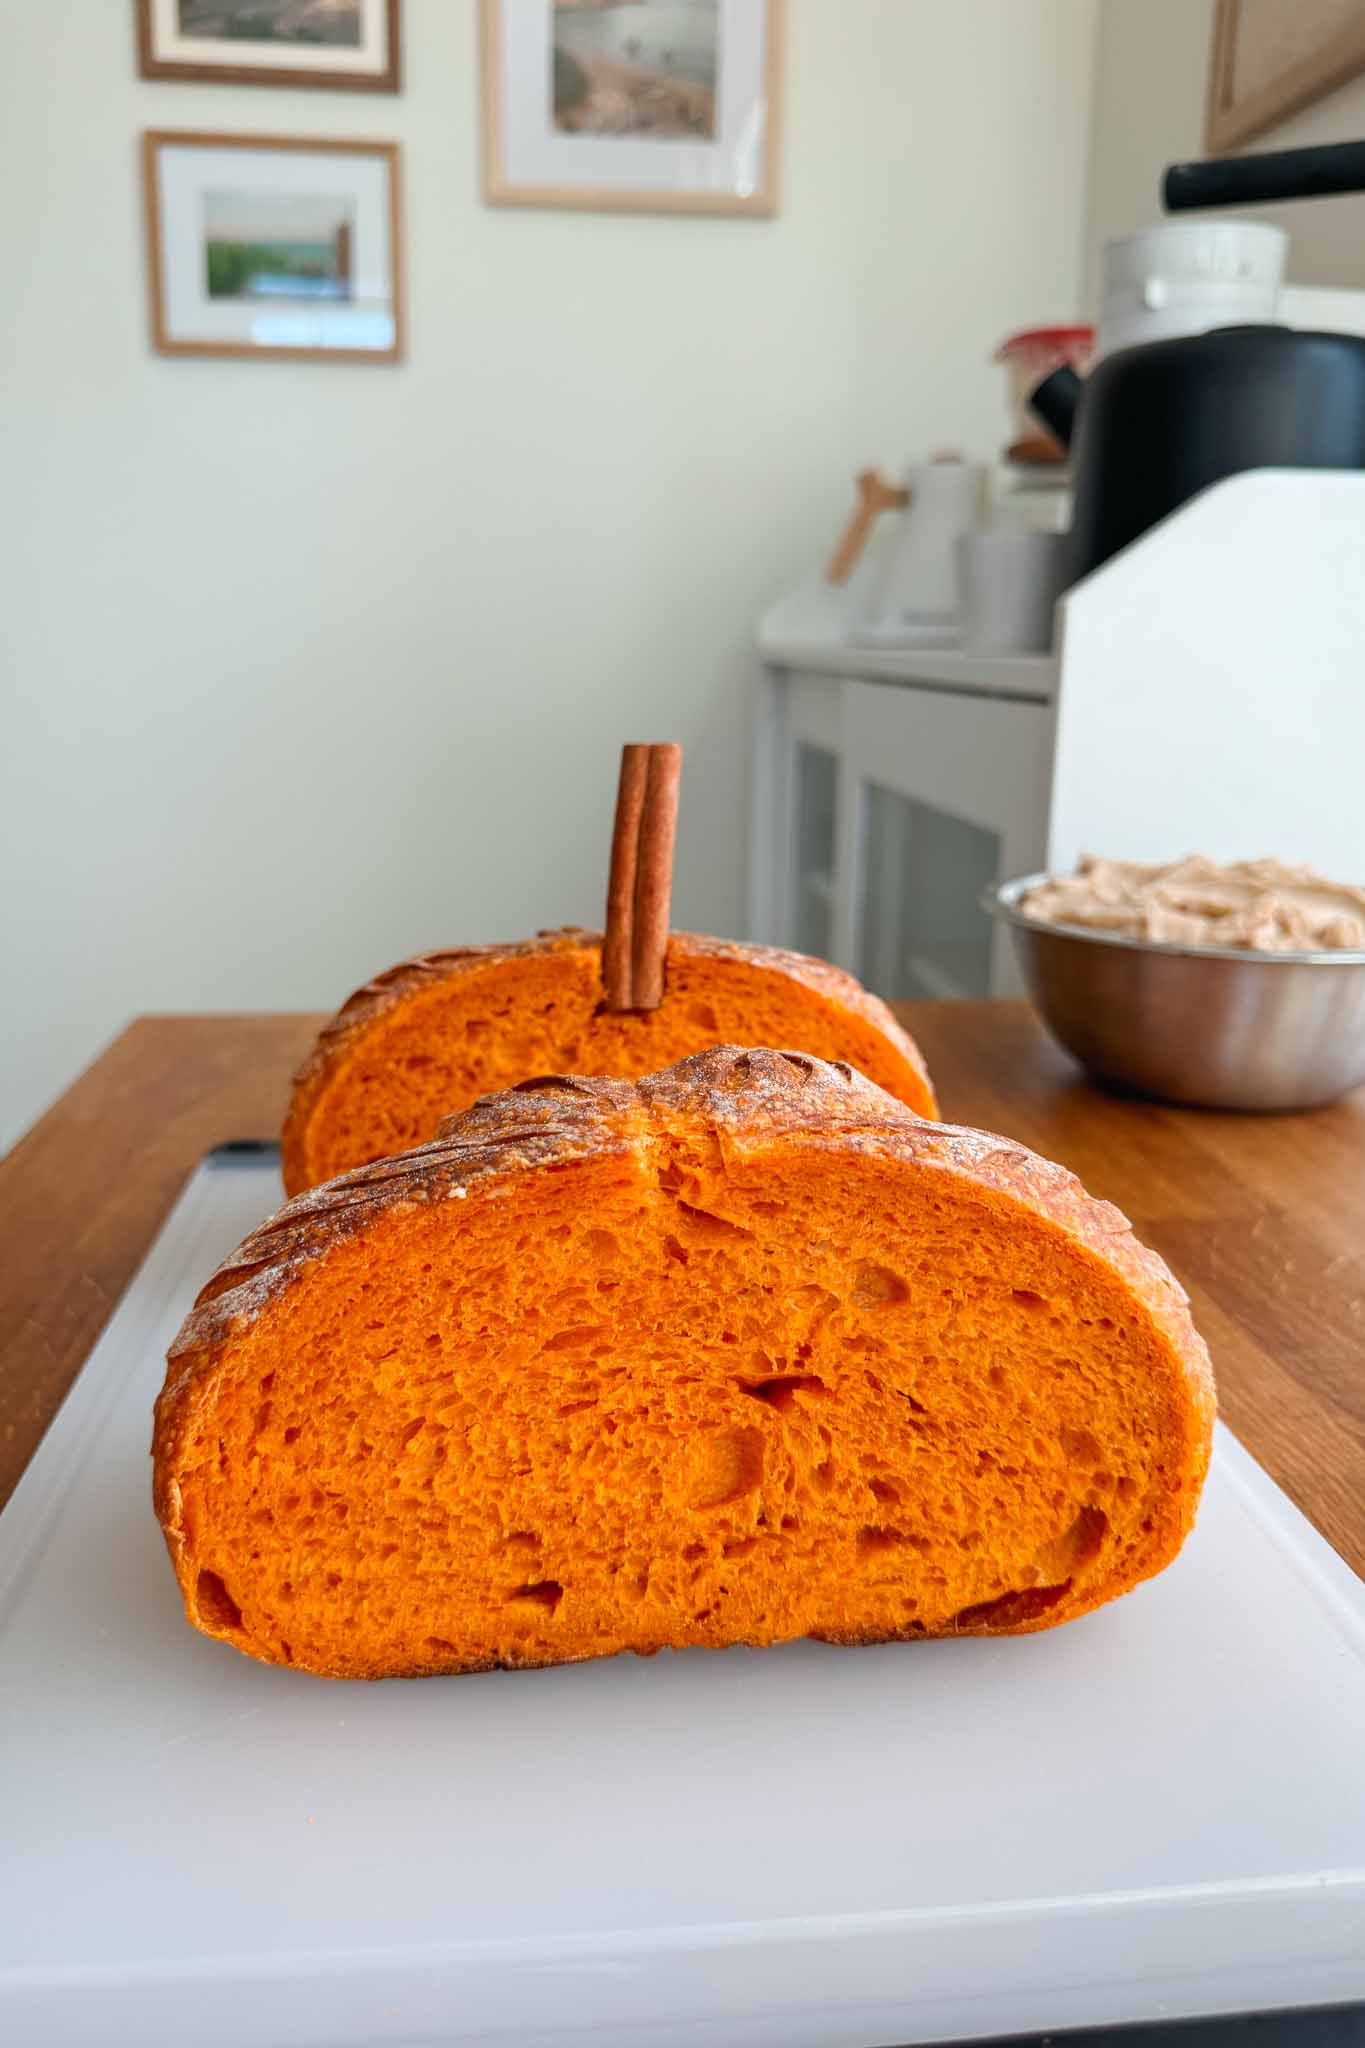
- Bake: Bake the dough for 30 minutes at 500°F. Lower the temp to 450°F, remove the lid, and continue baking for another 10- 15 minutes longer. The bread is done when it has a nice golden brown crust on the outside, or the internal temperature is between 205°F and 210°F. Remove the bread from the Dutch oven and place on a wire rack to cool. Allow the bread to fully cool before adding the stem or slicing (approximately 1 hour).
- Add the stem: Cut the strings and carefully remove them from the finished bread. Using your bread lame, or a sharp knife, cut a small X on top where the stem should go and insert the cinnamon stick.1 cinnamon stick (large) to be used as the stem
- Serve and Enjoy! Enjoy your delicious pumpkin bread with any of your favorite toppings! I like to pair mine with a delicious whipped honey butter for a sweet treat.