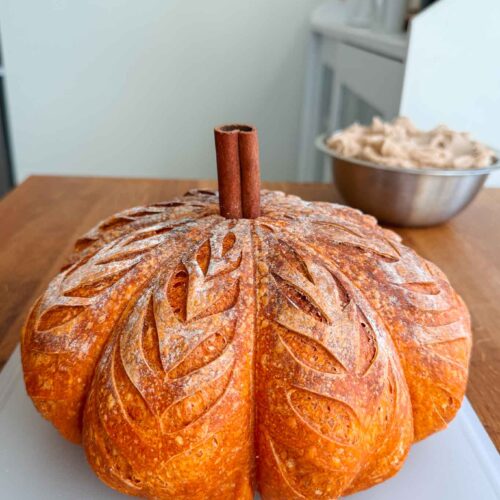
Pumpkin Shaped Sourdough Bread
This easy pumpkin shaped sourdough bread is the ultimate fall loaf! It’s loaded with real pumpkin, warm spices, and bakes up into a beautiful pumpkin shape.
Ingredients
Sourdough Starter
- 20 g 1 tablespoon sourdough starter
- 80 g ⅔ cups flour
- 80 g ⅓ cups water
Pumpkin Sourdough Bread
- 475 g ( 3¾ cups) Bread flour
- 25 g (3 tablespoons) Whole wheat flour (This is optional. You can replace it with bread flour if preferred.)
- 100 g (⅓ cup + 1 tablespoon) pumpkin puree
- 100 g (⅓ cup) sourdough starter
- 325 g (1⅓ cups + 1) water
- 10 g (1¾ teaspoons) salt
- 20 g (1 tabelspoon and 1 teaspoon) honey
- 1 teaspoon pumpkin spice
Additional Ingredients
- Optional: Orange food coloring to color your dough orange. I like this all-natural plant-based food coloring.
- Baking twine or food-grade cotton string (used for shaping the bread into a pumpkin)
- Oil for soaking the baking twine (I like to use olive oil or avocado oil, but any will work!)
- 1 cinnamon stick (large) to be used as the stem
Instructions
Feed your sourdough starter
- Feed starter: About 8–12 hours before mixing your dough, feed your sourdough starter. You’ll need 100g (½ cup) of active starter for this recipe, so I like to keep 20g (1 tablespoon) of starter and feed it with 80g (⅔ cup) flour and 80g (⅓ cup) water. It’s ready once it’s bubbly, doubled in size, and just starting to fall from its peak.20 g 1 tablespoon sourdough starter, 80 g ⅓ cups water, 80 g ⅔ cups flour
Day 1: Mix the dough and first rise (bulk fermentation)
- Mix the dough: In a large bowl, add the water, sourdough starter, honey, and optional food coloring, and whisk together until combined. Pour in the bread flour, whole wheat flour, pumpkin puree, pumpkin spice, and salt, and mix until a dough forms and no dry patches remain. Cover the dough and let rest at room temperature for 30 minutes.475 g ( 3¾ cups) Bread flour, 25 g (3 tablespoons) Whole wheat flour, 100 g (⅓ cup + 1 tablespoon) pumpkin puree, 100 g (⅓ cup) sourdough starter, 325 g (1⅓ cups + 1) water, 10 g (1¾ teaspoons) salt, 20 g (1 tabelspoon and 1 teaspoon) honey, 1 teaspoon pumpkin spice, Optional: Orange food coloring to color your dough orange. I like this all-natural plant-based food coloring.
- Stretch and fold: After 30 minutes, perform your first set of stretch and folds. To perform one set of stretch and folds, begin by splashing some water on your hands so they are damp. Grab one side of the dough, stretch it up and fold it all the way over the other side of the dough. Rotate the bowl and repeat this process with the next side. Once you’ve completed this process with all 4 sides, cover the dough and let it rest. Repeat this process every 60 minutes during the course of the bulk fermentation in the next step, until you’ve completed a total of 4 rounds of stretch and folds.
- First rise (bulk fermentation): Cover the bowl and let the dough rise at room temperature for roughly 6 - 8 hours. The dough is done rising once it has increased in size by roughly 50%, has air bubbles on top, and is jiggly when shaken. If you're using a glass or transparent plastic container, you will also see bubbles formed on the bottom of the dough. The fermentation time may vary depending on the temperature of your home and the strength of your sourdough starter.
- Shape the dough: Once your dough has completed its first rise, it’s time to shape. Line your proofing basket and dust it lightly with flour. Lightly flour your work surface and gently turn the dough out onto it. To shape, start by folding the bottom third of the dough up toward the center. Then, fold the left side in toward the middle, followed by the right side, slightly overlapping the left. Next, fold the top edge down just past the center, and bring the bottom edge up and over the top. Flip the dough so the seam rests on the counter. With floured hands, gently round the dough into a tight ball by pulling it toward you against the surface of the table to create tension. Use a bench scraper to transfer it to the floured proofing basket, seam-side up. This is my preferred shaping method, but there are many ways to shape sourdough bread — here’s a great video from The Perfect Loaf demonstrating the technique.
- Proof (second rise): Cover the dough and refrigerate it overnight, or for up to 48 hours. I recommend letting it proof for at least 12 hours — this slow fermentation develops deeper flavor, improves the crumb, and boosts the bread’s nutritional value. The extended rest gives your sourdough starter time to work its magic, enhancing both the gut-friendly benefits of the bread, along with the flavor and texture!
Day 2: Shape the Dough into a Pumpkin and Bake!
- Preheat oven and Dutch Oven: Preheat your oven to 500 degrees Fahrenheit and place your Dutch oven with the lid on to preheat for one hour.
- Prepare your strings: Cut the baking twine into four 20’’ long strings. Place the strings into a small bowl of oil and make sure they are completely submerged. This prevents the strings from sticking to the bread when you need to remove them later.Baking twine or food-grade cotton string, Oil for soaking the baking twine
- Shape into a pumpkin: Remove the dough from the fridge. While the dough is still in the banneton, lay each piece of string across the top of the dough so that they criss-cross over the center, forming a star pattern. Place a piece of parchment paper over the strings and the dough, and then gently turn the dough out onto the parchment paper so it's lying on the table. The strings should now be underneath the dough against the table. Working with one string at a time, take both ends and tie them together into a square knot over the center of the dough. Don’t tie it too tight; your dough will need room to expand while baking. Repeat this process with the remaining strings until you have a pumpkin-shaped dough with 8 sections.
- Score: Gently dust some flour over the top of the dough with a sifter, and score each section of the pumpkin-shaped dough with your favorite pattern. I created a leaf pattern for mine! Use the parchment paper to gently transfer the dough into the preheated Dutch oven and place the lid on.
- Bake: Bake the dough for 30 minutes at 500°F. Lower the temp to 450°F, remove the lid, and continue baking for another 10- 15 minutes longer. The bread is done when it has a nice golden brown crust on the outside, or the internal temperature is between 205°F and 210°F. Remove the bread from the Dutch oven and place on a wire rack to cool. Allow the bread to fully cool before adding the stem or slicing (approximately 1 hour).
- Add the stem: Cut the strings and carefully remove them from the finished bread. Using your bread lame, or a sharp knife, cut a small X on top where the stem should go and insert the cinnamon stick.1 cinnamon stick (large) to be used as the stem
- Serve and Enjoy! Enjoy your delicious pumpkin bread with any of your favorite toppings! I like to pair mine with a delicious whipped honey butter for a sweet treat.