How to Make Sourdough Starter (Beginner-Guide)
This beginner-friendly guide will teach you how to make a sourdough starter from scratch using just flour and water. In about a week, you’ll have a bubbly, active starter ready for baking homemade sourdough bread.
Equipment
- A glass jar (16oz - 32 oz) with lid. I recommend these wide mouth mason jars or these Weck jars.
- Rubber spatual or wooden spoon I love this whole set of silicon rubber spatulas.
- Kitchen scale Linking my favorite one from Amazon here.
Ingredients
- Bread flour I recommend starting with one 5lb bag. I like using King Arthur’s Bread Flour, but any unbleached bread flour will work well.
- Whole wheat flour (or another whole grain flour like rye, spelt, or and eiknorn).
- Water (I use tap water, but filtered water is great too!)
Instructions
Day 1
- Place a clean jar on your baking scale and tare it to zero. Add 100g (¾ cups) whole wheat flour and 100g (⅓ cups) water. Mix together with a rubber spatula or wooden spoon until combined and no dry patches remain. It will form a thick, paste-like texture. Cover the jar loosely with a lid or plastic wrap and let it sit somewhere warm (ideally around 75 degrees) for 24 hours.Tip: It’s important to keep your starter in a warm environment, approximately 70 - 75 degrees Fahrenheit, to help facilitate the fermentation process. If your home is cool (like mine!), you can place the jar inside an off oven with the oven light on for several hours, use a proof box, or a countertop oven with a proof setting. Even just a few hours in any of these warm environments will help jumpstart the fermentation process.Whole wheat flour, Water
Day 2
- You may start to see bubbles forming on the surface at this point, but it’s ok if you don’t! After 24 hours have passed, use your rubber spatula or wooden spoon to discard half of the starter in your jar (approximately 100g) – no need to be exact. There should be roughly 100g of starter remaining in the jar. To the same jar, add 50g (⅓ cup) of whole wheat flour, 50g (⅓ cup) bread flour, and 100g (⅓ cup) water. Mix everything together, loosely cover the jar, and place it in a warm place for another 24 hours.Bread flour, Whole wheat flour, Water
Day 3
- At this point you may notice more bubbles and overall activity in the jar. There may even be a strong, and possibly unpleasant smell -- don't worry this is normal! Discard half of the starter from the jar. To the jar, add 50g (⅓ cup) of whole wheat flour, 50g (⅓ cup) bread flour, and 100g (⅓ cup) water and mix together. Cover the jar and place it in a warm spot for another 24 hours.Tip: If your jar is starting to get a little crusty or you just feel like working with a fresh jar, you can swap it out with a clean jar prior to feeding. To do this, place a clean mason jar on your baking scale and tare it to zero. Add 75g of your starter mixture to the clean jar. Next, add the 50g of bread flour, 50g whole wheat flour, and 100g of water. Mix together until combined. You can swap out with a clean jar every time you feed your starter, or do so periodically, its totally up to you!
Day 4 and 5
- Repeat the same process from Day 3 on Day 4 and Day 5. Each time, discard half of the starter from the jar and feed it 50g (⅓ cup) of whole wheat flour, 50g (⅓ cup) bread flour, and 100g (⅓ cup) water.Between days 3 - 5, you may notice that your starter's activity level slows down or even comes to a halt. Don't worry if this happens, it's totally normal! The microbes in your starter are in constant flux during these early days and it will take time for a stable community to take hold. Just be patient and keep going forward with the process.
Day 6
- On day 6 you’ll give your starter two feedings. In the morning, discard half of the starter from the jar and add the same quantities that you’ve been feeding: 50g (⅓ cup) of whole wheat flour, 50g (⅓ cup) bread flour, and 100g (⅓ cup) water. Mix everything together and let the jar sit somewhere warm for 12 hours. Once 12 hours have passed, repeat the feeding process.
Day 7
- Repeat the same process from Day 6 on Day 7, feeding your starter twice per day.
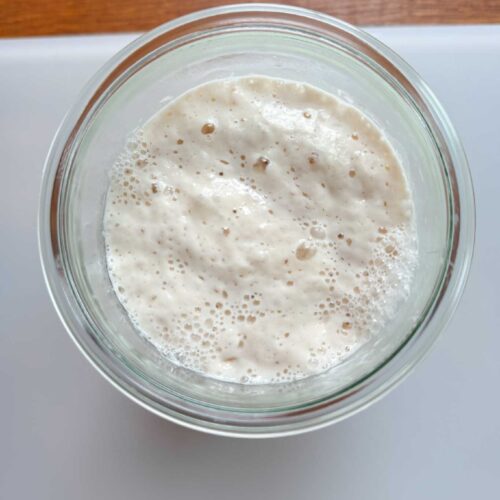
- By the end of day 7 and into Day 8, you should begin to see your sourdough starter double in size after feeding. It will appear vigorously bubbly and have a light, airy texture. You’ll also notice a pleasant acidic smell that may be reminiscent of vinegar and red wine. If your starter matches this description, then it is active and ready to be used! Transfer half of the starter to a clean jar, and feed the same ratio as before: add half of the starter from the jar and add the same quantities that you’ve been feeding: 50g (⅓ cup) of whole wheat flour, 50g (⅓ cup) bread flour, and 100g (⅓ cup) water.If your starter doesn’t match this description, do not worry! Continue feeding your starter every 12 hours until it is active and ready to use. This may take an additional 1 to 2 weeks, depending on many factors, like temperature, feeding times, flour, and more. Be patient, eventually the community of yeasts and bacteria in your starter will stabilize and it will start to match the description above!
You're Ready to Start Baking!
- Once your sourdough starter is active and ready to use, you can begin using it for all sorts of recipes! Check out my beginner sourdough bread, sourdough bagels, sourdough croissants, and so much more!
Sourdough Starter Storage and Maintenance
- Congratulations on creating your sourdough starter! With a little love and care, you can keep your starter going for years to come. Once you’ve named your starter (yes, she needs a name!), it’s time to decide on your preferred maintenance schedule. There are two main methods that home bakers use to maintain their sourdough starters.
Option 1: Store Your Starter in the Refrigerator
- Storing your starter in the refrigerator slows down the fermentation process, so you only need to feed your starter roughly once per week. This is the most common and easiest way to maintain your sourdough starter. All you have to do is feed your starter once a week, and follow the revival steps outlined in the Notes Section whenever you want to use it for baking. When you’re done baking, simply feed your starter and place it back in the fridge. When you’re not baking, store your starter in the fridge and feed 1x per week.
Option 2: Store on the Counter
- If you plan to bake more often, you can store your starter on the counter at room temperature. Because your starter is most active at warmer temperatures, you’ll need to feed it one to two times per day, indefinitely. If you're traveling or want to take a break, you can always switch over to method and transfer your starter to the fridge.
Notes
- How to Use Sourdough Starter from the Refrigerator
1–2 days before baking, remove your starter from the fridge. Transfer 50g of starter to a clean jar and feed it with 50g flour and 50g water. Once the starter has doubled in size and looks bubbly and active—typically within 8–24 hours—it can be used for baking. That said, I usually give it one additional feeding to ensure it’s at peak strength before using it in a recipe.